
Visiting a salon for that perfect manicure and pedicure is so relaxing and worth every penny spent to get those perfect nails. But let’s face the truth- it is costly even though it’s worthy! And moreover, who’s got time every month to spend hours in a salon in this fast-paced world! Pretty nails are obviously professional looking and make you look all glam, but it shouldn’t interfere with your budget and busy lifestyle. Stay calm, because you can now do both mani and pedi in your comfort zone. Here’s how you can perfect it at home…
 Things you’ll require:
- Cotton balls or cotton pads
- Acetone-free nail polish remover
- Nail buffer
- Nail file
- Exfoliating scrub (you can use a mixture of coconut/olive oil and sugar as well)
- Cuticle oil or vitamin E capsules
- Moisturiser
- Nail paint
- Base coat
- Top coat
DIY Manicure and Pedicure:
Step 1: Cleaning nails
The basic step for the manicure or pedicure is cleaning your nails properly. Remove the old nail paint if you are wearing one with an acetone-free nail polish remover.
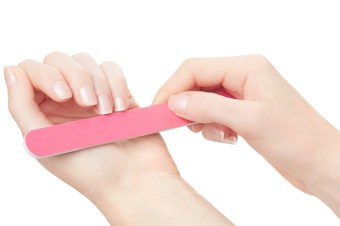 Step 2: Shaping and filing nails
- Take the nail buffer and start to buff your nails in one direction to give them a proper shape.
- You can cut them with a nail cutter if you feel they are long. But do keep in mind that you do not want to cut them short before proceeding with the filing.
- After you buff your nails, take the nail file and start to give them a proper shape.
- Round the edges of the nails slightly while you file them.
 Step 3: Soaking and exfoliation
- Take a bowl of lukewarm water and soak your hands or feet in them.
- You can also add a few drops of your favourite essential oils like lavender, tea tree, peppermint or vanilla to have a spa-like experience and soothe your senses.
- Take another bowl and add sugar and olive or coconut oil to make your own sugar scrub.
- Just a few tablespoons of the scrub are enough for exfoliation.
- Gently exfoliate your hands or feet with the scrub by massaging in circular motions.
- Rinse it with water thoroughly.
- You can store the scrub that’s leftover in an airtight container in a cool and dark place and use it for your next session.
Step 4: Removal of calluses and pushing back cuticles
It is essential to remove the dead skin cells around the edges of your nails so that your nails can grow healthy. Remove them from your nails carefully. Using a cuticle pusher, push back the cuticles of your nails once you get rid of the dead cells and ingrown cuticles.
 Step 5: Applying cuticle oil
By now your cuticles and nails would have turned smooth and soft. So, take a small amount of the cuticle oil or vitamin E oil and massage gently onto your cuticles and nails. This will make your nails strong, healthy and shiny and prevent them from breaking. Leave the oil for a few minutes and them with the help of a nail polish remover, remove the oil completely before moving to the next step.
Step 6: Never skip the base coat
Apply base coat to all your nails before you apply a nail colour. Let it dry completely.
Step 7: Apply nail paint
 Choose your favourite nail paint and apply two coats of it on each nail. Make sure you apply it as professionally as you can and without messing it up. Apply it in 2 thin layers and wait for the first layer to dry completely before you apply the other. Applying in thin layers will make sure that your nail polish lasts for a longer time and doesn’t chip off easily. Start applying from the centre of your nails and then slide the brush downwards. Repeat this process on each side of the nails. Do not apply the paint more than 3 times on a nail for each layer or it will mess up the look.
Step 8 – Seal the deal
Sealing the nail polish is essential to not only add shine, but also make it last longer. Apply a layer of top coat once the nail paint is dry. This will smoothen out your nails and make your nail colour last longer and doesn’t make them chip.
You can now relax and chill around with your new mani-pedi at home. It sounds so simple right? It is indeed! Do give it a try at home since it is much cost effective and you can do it your own comfort!
0 comments on “Perfecting the mani-pedi at home”